-
Welcome to 4Runners.com!
You are currently viewing as a guest! To get full-access, you need to register for a FREE account.
As a registered member, you’ll be able to:- Participate in all 4Runner discussion topics
- Transfer over your build thread from a different forum to this one
- Communicate privately with other 4Runner owners from around the world
- Post your own photos in our Members Gallery
- Access all special features of the site
 New coils and 1.25" spacers, got rid of that sag!
 Antenna alternatives?
 Sloppy shifter
 How to recharge and/or refill the AC system?
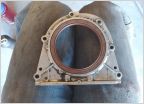 Rear main seal help
 Rear window relay fixed
Gatorgrl's Grand Gen2 4Runner makeover
Discussion in '2nd Gen 4Runners (1990-1995)' started by Fourtoad, May 3, 2019.
Page 2 of 24
Page 2 of 24