

-
Welcome to 4Runners.com!
You are currently viewing as a guest! To get full-access, you need to register for a FREE account.
As a registered member, you’ll be able to:- Participate in all 4Runner discussion topics
- Transfer over your build thread from a different forum to this one
- Communicate privately with other 4Runner owners from around the world
- Post your own photos in our Members Gallery
- Access all special features of the site
 ILSAC GF-6A engine oil
 Cabin Air filter part number clarification please.
 Holder/cubby for wireless charging?
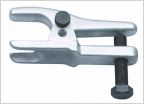 Ball Joint Separation Tool
 Cleaning Inside Windshield
 New to Toyotas
Diode Dynamics SL2 9005 as auxiliary lighting - removing / replacing DRLs in 2022+ 5th gens
Discussion in '5th Gen 4Runners (2010-2024)' started by MeefZah, Apr 22, 2024.


