1. Welcome to 4Runners.com!

    You are currently viewing as a guest! To get full-access, you need to register for a FREE account.

    As a registered member, you’ll be able to:
    • Participate in all 4Runner discussion topics
    • Transfer over your build thread from a different forum to this one
    • Communicate privately with other 4Runner owners from around the world
    • Post your own photos in our Members Gallery
    • Access all special features of the site

Oil leak

Discussion in '2nd Gen 4Runners (1990-1995)' started by TomC1994, Aug 25, 2020.

  1. Aug 25, 2020 at 2:52 PM
    #1
    TomC1994

    TomC1994 [OP] New Member

    Joined:
    Aug 11, 2019
    Member:
    #10862
    Messages:
    6
    Gender:
    Male
    First Name:
    Tom
    Vehicle:
    1995 4runner SR5
    none
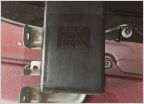
    4C1E0F2A-A940-4760-874F-1B5429406CF6.jpg 28A9FB29-FC0E-409E-85B3-4352570F524C.jpg I think I found the oil leak. Had to pause due to a storm but will be doing the passenger side later tonight/tomorrow as well as replacing the O rings on the oil cooler. Hopefully that fixes the issue!
     
  2. Aug 25, 2020 at 3:14 PM
    #2
    Trekker

    Trekker Regular Member

    Joined:
    Jul 25, 2020
    Member:
    #15732
    Messages:
    904
    Gender:
    Male
    Vehicle:
    1997 3rz 5spd
    Those engines are notorious for blowing head gaskets. Hope that fixes it
     
  3. Aug 26, 2020 at 11:43 AM
    #3
    trlhiker

    trlhiker Lazy Bum

    Joined:
    Nov 8, 2019
    Member:
    #11913
    Messages:
    2,276
    Gender:
    Male
    Vehicle:
    1992 4Runner SR5 V6 4X4
    Valve cover leaks are common on 2nd gens. They luckily have nothing to do with the head gaskets. While you have the covers off, change your PCV valve.
     
  4. Aug 28, 2020 at 1:00 PM
    #4
    atgparker

    atgparker Cal Poly, ETME 1988

    Joined:
    Jun 20, 2018
    Member:
    #6296
    Messages:
    328
    Gender:
    Male
    First Name:
    Andrew
    Mission Viejo, CA
    Vehicle:
    1991 White 4Runner 3.0 L
    Rebuilt Engine MLS and ARP on the heads, DT Header, 2-1/2" CARB compliant Flow-Master CAT with 2.0" Bosal CAT back Dayco 1-1/4" Spacers, SkyJacker M-Series Monotube Shocks, Ball Joint Spacers. 95-9006 K&N Air Cleaner, G-Plus Alum Radiator, ZIrgo 16" Fan, Derale Temp switch/relay
    The rear cap plugs that "seal up" the ends of the CAM's are steel (I think) with rubberized overmolded surfaces on them. While your at it I would remove the back CAM bearing caps and clean this up really well with carb cleaner and reseal the bearing caps to the heads with 515 Loctite Gasket maker. But before you set them back on the heads apply liberal amounts of Permatex Right-Stuff gasket maker to the outside diameter of these cap plugs and then set them in the heads being sure to not clog up the oil return port in the head. Then set the bearing caps onto the cams, caps and heads. This will allow the Right-Stuff to squirt out as you draw the bearing cap down with the 4 machine screws that set the cam bearing in place. The valve covers are molded plastic composite and are awful. The silicone gaskets seem better than the black rubber ones and I have tired Halomar in the groove and on the heads surface to aid with allowing the gasket to move around but maintain a seal. I used Right-Stuff at the sharp corners were the gasket travels over the cam and there is a 90° turn in the gaskets direction over the bearing caps. The front of the covers have to go under the shrouding and the ruddy gasket can fall out of the cover and not set correctly on the bearing cap and head surfaces so be aware of that as it is hard to see if its still in place.

    I drilled my engines heads to create a drain hole for the oil near the lower edge where the valve cover gasket is close to those small ponds of oil that never go away.
     

Products Discussed in

To Top