

-
Welcome to 4Runners.com!
You are currently viewing as a guest! To get full-access, you need to register for a FREE account.
As a registered member, you’ll be able to:- Participate in all 4Runner discussion topics
- Transfer over your build thread from a different forum to this one
- Communicate privately with other 4Runner owners from around the world
- Post your own photos in our Members Gallery
- Access all special features of the site
 Storage box or something. 2022 with cargo deck
 Hey Electroboy!
 Molle panel attachments?
 Real Talk: What mods are needed for CO Offroading?
 Has anyone used a Yakima or Thule rooftop box/pod with the oem horizontal rails?
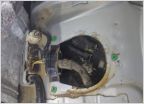 Fuel Pump Replacement on 5th Gen Toyota 4Runner
A Guy A Girl and a Trail: Adventures in a 4Runner Limited
Discussion in '5th Gen 4Runners (2010-2024)' started by Agent_Outside, Jan 19, 2019.
Page 6 of 28
Page 6 of 28

