

-
Welcome to 4Runners.com!
You are currently viewing as a guest! To get full-access, you need to register for a FREE account.
As a registered member, you’ll be able to:- Participate in all 4Runner discussion topics
- Transfer over your build thread from a different forum to this one
- Communicate privately with other 4Runner owners from around the world
- Post your own photos in our Members Gallery
- Access all special features of the site
Quick Links: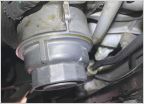 Oil filter oil leak?
  Break in oil change 2024 4Runner SR5 Premium--What parts need exactly?
  2014 Head Unit will reset itself randomly - Fuse issue?
  May I ask where you gentlemen purchase your Toyota engine oil from?
  Need Help Finding Interior Trim Piece for 2010 or Newer 4Runner Please!
 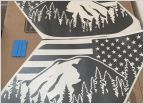 Rear quarter window flag decal?
A Guy A Girl and a Trail: Adventures in a 4Runner Limited
Discussion in '5th Gen 4Runners (2010-2024)' started by Agent_Outside, Jan 19, 2019.
Page 17 of 28
Page 17 of 28

